7 simple tips for photographing light with your smartphone
How to make the shot of Christmas lights or decorative lights for an event memorable? Discover expert tips for capturing better photos.

Date
05.02.2018
Reading time
10 min
There is no need to be experts to assert that photography is all about light. If the light is not right, the beauty of a landscape, an object, or a person will be lost, resulting in a dull and ineffective image.
Now try to imagine having to photograph decorative lights: those on your Christmas tree or those that decorate your interiors throughout the year. You will realize that photographing lights is something more complex than framing an image and pressing a button.
To be helpful, especially to those who mostly take photos with their smartphones, we have thought of revealing some simple tricks to produce better photos without having to use a real camera.
1. Balancing between ambient light and decorative lights
First of all, find the right balance between ambient and decorative lighting.
You might think that the best way to make your lights stand out is to photograph them in complete darkness, but you'd end up with a photo where the lights are floating in an undefined blackness, or a photo where you can distinguish the elements of the scene but with the decorative lights excessively bright and blown out. This happens because the contrast is too high.
If you are indoors, you can play with various elements: you can partially close the windows, draw the curtains, or turn on some small soft lights in the house to create the right atmosphere while avoiding too strong contrasts.
If, on the other hand, you want to photograph the lights of your outdoor setup, it is essential to seize the moment. The best time is that brief period when the sun is gradually disappearing below the horizon: there is no more daylight, but it is not completely dark yet.

2. Do not use flash
Our most important suggestion is not to use the flash.
Outdoors, it is entirely useless, and indoors, it has a negative impact on the effect produced naturally by the ambient light, which is precisely what we want to capture. The subject will appear to be subjected to a sudden and violent wave of light that will ruin all the magic.
Make sure you have turned off the flash to avoid it automatically activating in these low-light situations.
3. Choose a tripod
No one likes blurry photos. When we take photos during the day with plenty of light, we don't have this problem: the cell phone needs a very short exposure time to gather the necessary light and can easily freeze the image.
In low light conditions, as in our case, we need to be more careful because the time taken to capture the photo is much longer, and our photo may result in being blurry if we cannot remain perfectly still during that time.
The same applies to the subject we are photographing, which should remain still during the shot, but it's not always possible.
To avoid compromising the photo quality with your movement, place your cellphone on a support to keep it steady for a few seconds, or use a tripod if you have one.
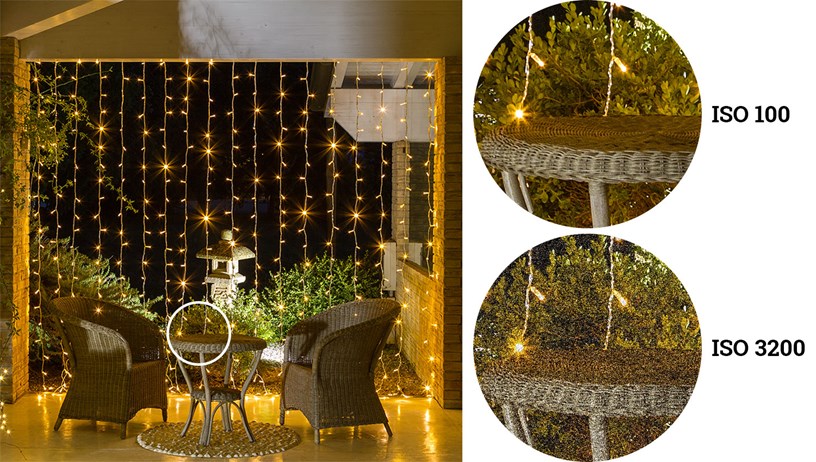
If you use a tripod and need to photograph still objects, you can set a parameter called ISO sensitivity, which is available in compact cameras and many smartphones. By setting it to the minimum (usually ISO 100), you will have a better quality photo, avoiding the so-called digital noise, which is the cause of grainy photos usually obtained in low light conditions.
The phone will need even more time to take the photo, but in this specific case, it won't cause any problems because everything is perfectly still. When using this technique, set the self-timer so that the phone takes the shot a few seconds after you press the button or touch the screen. This way, you can be sure not to accidentally move it while it takes the photo.
If, on the other hand, you are photographing a moving subject (which could be a person or even the outdoor lights moving in the wind), unfortunately, the tripod won't be of much help.
You can only minimize the exposure time by increasing the ISO value. You can keep the default ISO Auto setting, and the phone will automatically increase it when there is less light. This will help you avoid blurry photos but may compromise the overall photo quality.
4. Do not use the zoom
If possible, avoid using the zoom on your smartphone. The quality is better if you refrain from zooming and position yourself at the right distance from the subject of the photo. The zoom on many smartphone is not a true optical zoom but a simulated one (also called digital zoom): by default, the smartphone captures the central part of the image and enlarges it. When you view the same image on a computer, unfortunately, you will notice many small squares (the so-called pixels) that make up the image.
5. The main subject of the photograph
Before taking a photo, ask yourself what the main subject of the photograph is. This doesn't necessarily mean that the subject should fill the frame, but it should be clear to the viewer what has more prominence and what has less. Remember to focus by touching the screen on the point where the main subject you want to highlight is present.

6. Exposure compensation
Cell phones and cameras, to be able to decide autonomously which settings to use for a particular photo, have a sensor called light meter, which measures the amount of light present in the frame. In most cases, it works very well, but sometimes it can be deceived by particular lighting conditions, as in our case, and not provide correct settings.
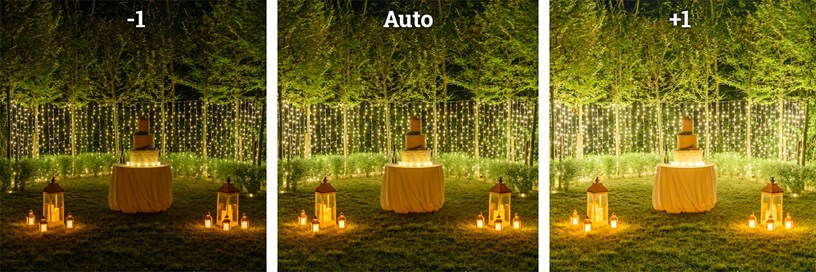
It may happen that when you frame your scene, you see the preview too bright or too dark compared to how you would like the photo to appear. In these cases, you can use the exposure compensation to achieve the desired brightness in the photo, without needing to set all the parameters manually: the camera continues to use the light meter, correcting it more or less based on your choice.
It is a feature present in any smartphone or camera, and it is generally represented by a square with +/- inside. On some smartphones, it is indicated by a slider with the symbol of the sun.
7. The HDR Function
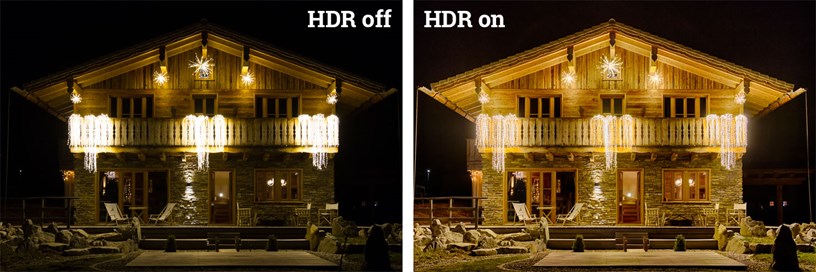
Lately, many smartphones have a feature called HDR that can help us when photographing scenes with very high contrast. The phone takes several photos in rapid succession, varying the exposure, and automatically blends them into a final image, brightening up areas that are too dark and darkening those that are too bright.
The results can be somewhat unpredictable and not always optimal, but in certain cases, it can be helpful. Do some tests and evaluate if the effect is good; however, remember that the best results will be obtained using a tripod and photographing stationary objects. Otherwise, you might see strange effects in the final photo.
We hope you can benefit from our suggestions, and we look forward to receiving many beautiful photos of luminous subjects from you soon 😉


